Friday 30 March 2012

Military Skirt patterns

This is a post on my military skirt patterns, For some reason I imagined that I already posted this!

(Unfortunately the image above isn't very good) To start my patterns I began first draft by tracing around a skirt block, I included the hip lines and darts and I also added a line were the box pleat would be. On the centre back line I also added extra flare by extending the hem line a little bit and then joining the end of the line to the hip line so the line is smooth.


Next I traced around the front piece adding the dart and hip line, I then cut this out. After I cut that out I then measured the width of the box pleat on my first draft, Then(I think) I took a new piece of paper and drew a straight line I then added on double the width of the box pleat. I then cut this out and taped this on the centre front of the pattern making sure the line met the edge of the pattern, then I folded the paper in half exactly. I then cut out another strip of paper the width of the box pleat and taped this onto the edge.
I traced over this on another piece of paper and then I added a 1.5cm seam allowance and cut it out.


I also traced around the back piece and added a kick pleat to the centre back by using a set square to draw a 45 degree angle, I then drew a straight line down and across to create the shape above then I added a 1.5cm seam allowance and cut it out.

Yoke Patterns.
To get the yoke patterns I traced around the top of the skirt patterns to the hip line, I then cut those out and closed the darts. To get the facings I used a set square to draw a line 5cm distance parallel to the waist line and then closed the darts
Here are the adapted yoke pieces, I traced these of from my first draft cut them out and closed the darts.

I traced around the adapted yoke pieces and added a 1.5cm seam allowance and cut them out.

Here are my final front and back skirt pattern pieces.

Thanks for reading!! I hope this made sence!

Jenny xxx

Tuesday 27 March 2012

Equality and Diversity Sketchbook

For my theme for my final dress I have chosen Gender from Equality and Diversity.
To begin with I have taken the most recognised symbol for gender and I turned it into a stencil. I also experimented with placing the stencils and used this as a design for a textiles sample(on right page)


On the next page I collage using stereotypical prints, textures and colours to show the difference of gender.
After this I went on to look at other symbols that can represent gender and I found that the 'Yin and Yang' sign is a very famous and popular one, I found that the white can represent women and the black men; I also found that the circle represents the world and that generally the 'yin and yang' represents two forces/objects that cannot function with out each other, This reminded me of men and women as with out each other there would be no children, therefore no people and no population on earth. 


I then went on to look at the femininity side of the 'yin and yang', this made me think of flowers as feminine is considered very delicate as are flowers. After that i thought about what can be used to represent femininity and I immediately thought of pearls(this also reminds me of grandmothers) as they can represent femininity and wealth.


When I was looking into pearls I found that freshwater pearls are some of the most popular pearls and that they were first sold as ornaments in Japan, this is when I started to look into Japanese hairpieces which then lead me to geisha's hairpieces called "Kanzashi"( more on this in the next post)
On the left is my shape development

Thanks for reading! I hope my book makes sense and I hope you like my drawings!

Jenny xxx

Tuesday 20 March 2012

Equality and Diversity


In my latest brief I have had to research into Equality and diversity, for my final piece I have decided to look into gender. 

My research thread has taken me from gender to pearls and some how to geisha's hair pieces. 


Later I will be posting images and information from my sketchbook. 
Thanks for reading! 

Jenny xxx

Thursday 15 March 2012

Strawberry Polka Dots

The other day I decided to take a break from my work and paint my nails whilst there all at the same length. I have painted strawberry nails before but they look much cuter in a baby pink than red, I definitely be trying this again.

On my thumb and ring finger I painted pink strawberries and the other 3 fingers i painted pink and blue polka dots, originally i was going to make these dots into roses but I liked them how they looked without.
For this I used BarryM nail polish and for the pink dots I used a cheap poundland polish (*Tip never but poundland nail polish worst polish I have ever used!)

Hello kitty strawberry squishy - This is such a cute accessory! X3

Thank for reading! I hope you like my nails!
^^Possible hint for my next nail designs ^_^

Jenny xxx


Friday 9 March 2012

Manufacturing a Shirt

This week I just finished manufacturing a shirt apart from the buttons and button holes, her I am going to share with you how I manufactured my shirt.

First I placed and pinned my pattern pieces onto my fabric and then cut them out, I also cut out interfacing for my cuff, button stand, collar stand and collar.


I then ironed on my interfacing to the button stand and folded it over, I then top stitched over the button stand. (the image above is my button stands)

Next I sandwiched the back shirt piece to my yoke pieces and added a mini box pleat in the centre of the back piece sewed them together. Really the box pleat should have been sewed closer together but that's a lesson learnt for next time.

I then sewed my pocked by sewing both pocket pieces together(right sides together) and leaving a small gap in the stitching to tun the picket inside out, I then cut the seam allowance in half to reduce bulk and then bagged out the pocket and sewed the pocked onto the right front shirt piece over the chest area.
I then sewed my two front pieces to the back shoulder and over locked the edges.

I then ironed on the interfacing to the collar, placed them right sides together and sewed a 1.5cm seam allowance, then I cut the seam allowance in half to reduce bulk. After that I bagged out the collar and pressed it.
After I pressed the collar I sandwiched the collar between the two collar stands and stitched in place 1.5 seam allowance, I also cut notches to give the collar ease when sewing.

Then I started to attach the collar to the shirt pieces by sewing one side of the collar stand to the top of the yolk pieces and then I folded over the other side of the collar stand and top stitched to give a neat finish, I then ironed the collar and collar stand.

Next I worked on the sleeve vent, First I sliced up the sleeve vent on both sleeves and then cut 2 strips of bias binding, I then attached the wrong side of the fabric to the bias binding with a 1cm seam allowance, I cut the seam allowance in half and ironed the bias strip over for a neat finish and top stitched.


I then sewed the sleeves to the shirt by attaching them at the shoulder first and over locking the edges, I then sewed attached the front and back of the shirt by sewing under the sleeve and then sewing the sides together, after that I pressed and over locked.


next I ironed on the interfacing to my cuffs and folded over 1.5cm on the top edge of 2 cuff pieces, I then top stitched 1cm distance from the edge. After this I placed the top stitch side of the cuff to the other untouched side (right sides together) and i sewed 1.5cm seam allowance on the sides creating this shape[ so that there is a gap in the middle, I then cut the seam allowance in half and bagged them out.


 To sew the cuffs on I first ruffled the edges of the sleeves by sewing 2 stitch lines 1 under 1.5cm and 1 over 1.5cm seam allowance, I then Pulled the top threads and pulled the fabric down the thread to create ruffles.


I the sewed the longer side of the cuff too the sleeve 1.5cm seam allowance and then I pulled the top half over and tucked the ruffled edge in inside the cuff.

 After I tucked the ruffles in I top stitched over the edge to give a nice finish and the I unpicked the longer row of stitching used to create the ruffles. This was the last step I did as I couldn't sew the button holes.


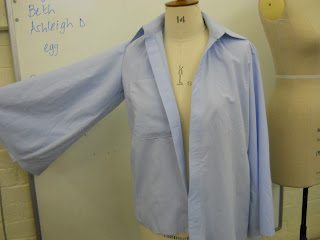
This is the finished shirt without buttons, I feel that I did well making this shirt however it would have been nice to have finished it sooner as I found that I got irritated after taking so long. I'm really glad that I have learnt how to manufacture a shirt like this and now I definitely understand and appreciate how much hard work goes into manufacturing a shirt like this.


Here are some images of my friend Modelling the shirt and skirts that I have manufactured.

Thanks for reading! I hope this post was use full!
What do you think of my shirt??

Jenny xxx

Related Posts Plugin for WordPress, Blogger...